
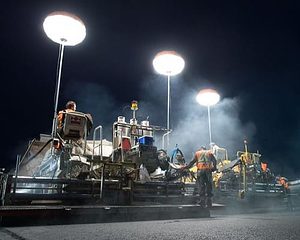
When I first received a balloon light1 for a night-time infrastructure project, I didn’t think much about setup. I thought I could figure it out on the spot. But what should have taken ten minutes took almost an hour—and the light didn’t stay stable. That experience taught me how important proper setup and maintenance2 are. Since then, I’ve built a habit of doing it right the first time, every time.
Let me show you how to set up your air light balloon correctly and take care of it so it lasts longer and performs better.
Step-by-Step Setup Guide
1. Unpack Carefully
Start by taking out all the parts: the balloon unit, tripod or pole, cables, and power source. Make sure you’re working on a flat, stable surface. I always double-check the ground for debris or sharp rocks, especially if the balloon has a fabric base.
2. Assemble the Tripod or Mount

Open the tripod legs fully and lock them in place. If you're using a telescopic pole, extend it halfway first. That gives you room to attach the balloon before raising it fully. This makes it easier and safer to manage.
3. Attach the Balloon Light Head
Connect the balloon light1 to the mounting bracket. Make sure it clicks or tightens securely. I’ve seen lights fall because someone rushed through this step.
Once secured, connect any power cables. Most units have a clear label for input/output.
4. Inflate the Balloon
If the model is air-inflated, plug in the air pump and let it fill the balloon. Do not overinflate. Most models have a pressure release or auto-stop system, but if yours doesn’t, stop once the balloon feels firm but not rigid.
Some models use internal fans or do not need inflation. Always read the instructions specific to your unit.
5. Raise the Pole Fully
Once everything is connected and the balloon is inflated, raise the pole to its full height. Lock it in place. Always stand to the side, not directly under the balloon, in case something slips.
6. Connect the Power and Test
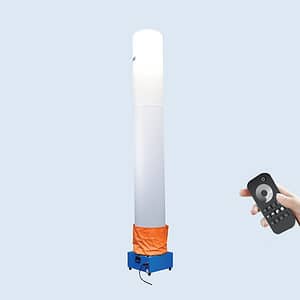
Plug the power cord into your outlet, battery, or generator. Turn it on and check for light. If your balloon supports remote or APP control, sync your controller before lifting the pole next time.
Dive Deeper: Safety and Setup Habits That Matter
Over the years, I’ve learned that skipping steps always costs more time in the end. One time, a teammate didn’t tighten the pole lock. An hour later, the balloon slowly collapsed onto a crowded workspace. No one got hurt, but it disrupted everything.
That’s why I now follow a fixed checklist every time. Setups happen in the dark, in the rain, or when people are rushing. Don’t trust memory—trust routine. Use gloves, protect the cords from foot traffic, and always test the controls before walking away.
Maintenance Tips for Long-Term Use
A balloon light can last thousands of hours—if you take care of it. I’ve seen units fail in six months due to poor care. I’ve also seen ones still running after five years. Here's how to make yours last:
1. Clean After Every Use
Wipe down the balloon surface with a soft cloth and mild cleaner. Don’t use harsh chemicals. Dust, mud, and grease affect the light output and can wear down the fabric over time.
2. Inspect the Cables
After each job, check power cables for cuts or bends. Look at the plug heads too. I replace cables at the first sign of wear. It’s not worth the risk.
3. Store in a Dry, Sealed Case
Moisture is the enemy. If you used the light in rain or snow, dry it fully before packing it away. I once stored a damp light thinking it would air out. A week later, it smelled bad and had mold spots.
4. Check the Mounting Hardware
Look at screws, brackets, and the pole locks. Make sure nothing is loose or rusted. A failed tripod can damage the whole light.
5. Test Monthly (Even If You Don’t Use It)
If the light goes unused for long periods, I power it up once a month. I inflate it, check the controls, and run it for 10 minutes. This keeps the parts active and helps me catch issues early.
Dive Deeper: When Maintenance Saves the Job
I once got called to help on a video shoot where the crew’s balloon light1 stopped working. They’d stored it in a van for six months without checking. The internal fan had seized up, and the fabric was brittle. We had to scramble for a replacement.
That’s when I added monthly checkups to my process. Now, before every job, I know my lights are ready. It’s five minutes of work that saves hours of stress.
Troubleshooting Common Issues
- Balloon doesn’t inflate → Check the pump power or leaks around the seal
- Light won’t turn on → Test the power supply, try a new cable, or check the internal fuse
- Flickering or dimming → This could be a voltage issue or water damage; stop use and inspect
- Control issues (remote/APP) → Re-pair the controller, check signal distance, or update firmware
If you're stuck, contact the manufacturer early. Good suppliers will walk you through fixes or send spare parts fast.
Conclusion
Air light balloons are easy to use—but only if you treat them right. Proper setup keeps your project running smoothly. Good maintenance makes your investment last. I’ve learned these lessons the hard way, but you don’t have to. With a few simple steps, you can get the best light with the least trouble.
Need a model that’s built for durability? Try Moonlightia’s Pro Series balloon lights—they're designed to handle real-world abuse and still shine strong.
